Monday, April 25, 2011

Garden Sign

I know that I have been blessed with a great family, and the past couple of weeks has only confirmed that! Being that I am getting closer to my due date, many family members have offered to help. This past week my Mother-in-Law came to help us get the yard into shape. I love spring flowers, but I am definitely having some difficulty getting on the ground right now! Here are some pictures of the flowers we were able to plant.

I love having flowers at the house. My mother-in-law was awesome doing not only the beautifying, but also getting rid of a bunch of junk from all our projects!!!! She was a blessing to have around and so helpful to me. Thanks so much Joni for helping out!!!

Each year we(really my husband) plants a garden for us to enjoy tomatoes, zucchini, yellow squash and various other vegetables from the garden. I am by no means a green thumb, so he knows he has to put everything on drippers! This year we have sectioned off a unique portion of our backyard for the garden. I thought it would be appropriate to add a fun sign! (Yes, everything in our house may be labeled one day, ha!) I went to the local Habitat for Humanity ReStore and was able to find an old wooden frame window for $3!

Here is the window...

Here is a closer look. As you can see it needs some sanding. If I was going to hang this inside I would have probably put a couple of nails in it and put putty in the holes and edges, but since it was going outside I figured rustic was better!

I then sanded the whole window with my handy-dandy electric sander...

And painted it with the turquoise color that I wanted. I would recommend using any wood paint. I applied the paint with a foam brush which gave it a soft look. Another option would be to give it a good coat of paint and go back over it with a sander to vintage it.

I then went to my trusty Silhouette and cut out the words that I wanted. I used the premium vinyl which the box says will hold up outdoors for 3 years! I thought that would suffice!

Here are my words with some embellishments ready to be put on, which I highly recommend using transfer paper to do.

Here it is!


To hang the window, I drilled holes in the top of the frame and used twine to tie it to the fence.

We haven't planted our garden yet, but we are almost ready to go! Hope everyone had a joyous Easter!

Saturday, April 16, 2011

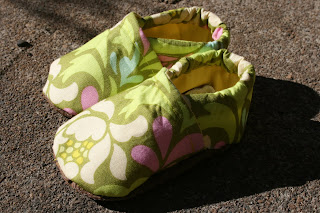
Love these shoes...

As I am approaching the end of my pregnancy (which I am looking forward to!) I am feeling more and more aches and pains. Ahhh, the joys of being pregnant! Not a ton of projects have been completed, but I have had quite a few projects waiting to be blogged and thought this one was quite a winner! Since I love shoes, yet know they are not very practical for newborns I found this very cute and easy pattern to make baby shoes. The pattern and instructions are on Stardust Shoes. She writes the instructions for Michael Miller Fabrics and recently I have really loved their designs!

One thing I do love about this shoe is that it does not take a lot of fabric, so I can use my scraps ;) The only thing I had to buy was a leather for the sole, which I will have extra galore! The pattern says that the shoe is for 0-6 mo, but it really can be used for a child up to 1 yr. Sizes can be altered by adding an extra 1/4" to 1/2" to the pattern, super easy!

Here is my fabric with my interfacing ironed on...


Here are the toe portions ready to go...


And here are the heel portions...


Here is a bit of it sewn together and...

Here they are!


There are lots of ways the shoes could be embellished, but I thought these looked good the way they were (and a little girl's birthday present was overdue, yikes!) and opted for a plain shoe. I am really hoping I can make some for my little man and can find some great fabric for him.

I have projects galore these next four weeks (or til baby arrives) but think it is my crazy nesting giving me the energy! Until then!

Monday, April 11, 2011

My Mom Rocks!

So, as I said in my last post my mom was coming up to help me conquer some projects. She is a go-getter and we were able to accomplish MORE than was on my list. Seriously, I could not have finished all this without her and love how willing and more than able she is to help me out! I am so excited and want to show you some of the projects that we worked on.

First, Jeff has been building a playhouse for the girls the past couple of months. This is quite the playhouse as you will see. I'll start from the beginning...

This is the foundation before it was poured.


This is a portion of the playhouse before it was all painted. I didn't really get any in between pictures, sorry!


This is the inside of the playhouse with the drywall almost done, and little Miss B showing off!

The front door that Brooklynn really wanted red!

This is what the outside of the house turned out like! I LOVE it!!!

This is what the inside ended up looking like! We finished the drywall, sanded and textured, then my mom painted.

This is the inside completed with the pink loft installed and the laminate floors! So happy to have this project done and I wouldn't have been able to do it without my mom's help!

THANKS MOM!!!!

Also, we were able to redo a waterfall-style dresser that I purchased before she came. I didn't get any good pictures of it before :(

Here it is after my mom had sanded it

I love the shape of this dresser and think it will look great in the baby's room!

The drawers sanded...

This is the final product and I really love how it turned out! Hopefully we can get the room together before baby boy gets here!

We even finished more than this, but thought these were the two biggest projects I could share. Thanks again mom for all the help and love!

Monday, April 4, 2011

A Fun Gift for Boys

I am so excited for this week! My mom is flying up today and I have a list of stuff for us to get done before the baby gets here! She is great at helping me accomplish certain tasks with a focused energy (which I need right now!) and she really is a blessing for me to do things with. Last year when we moved into our house she helped me paint almost the whole thing (trim, doors, walls, I mean all) before we moved in. I am hoping to show some of the projects that we are working on in the blog next week. It should be a fun week!

This is a project that I have been working on the past couple of weeks. I really enjoyed this project and think it is a great gift for a young boy. This was taken from Homemade by Jill. She has really great directions, so check out her blog. I chose to use a more lightweight material as I am not a huge fan of working with jean! The great thing about this present is I tried to use everything I had at home (I did have to buy one upholstery weight fabric) but otherwise I had everything! Cars are super cheap, so it is a fun, inexpensive gift!

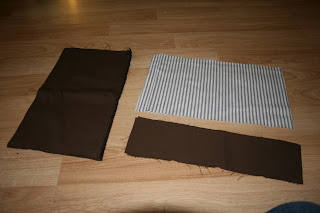
First I cut the fabric according to the dimensions on the website.


Then I attached the pocket to the interior fabric.


I then cut the road and stripes and sewed them on. At this point I attached the back. I did not use piping on mine and thought it turned out great. Also, instead of using the car applique I just painted on their initial for the sake of time.

This is what the outside ended up looking like...


I then was able to cut numbers from the Silhouette machine with Freezer paper. It makes using freezer paper really easy. I saved my setting for the Freezer paper so I can go back and do it again!


I painted the numbers on...

Then painted on the initial that I had cut out from the Freezer paper.

This is how the outside turned out with the Velcro tie in the back.

This is how the inside looks!

I just added some cars and viola, a traveling car cozy!

Enjoy and looking forward to next week!